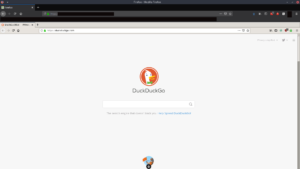
Have you ever dreamed of opening up your web browser, navigating to a website, and once the website loads, you have a whole other functional browser within that web page??? Neither had I until I read this blog post. If you need a visual to understand exactly what I mean, check out the picture at the bottom of this post or click this link. I’ll admit, the use-cases for this kind of thing are fairly limited, but the idea behind the original project is pretty cool. It’s like the movie Inception, but with browsers! The web page renders a remote desktop connection to a container that is locked into Chromium. When I first started exploring with Docker, this is a container that I set up to play around with.
After a while, I thought of ways that I could improve Ivonet’s project. I prefer Firefox over Chromium, so first I needed to modify the Dockerfile so that it would use Firefox instead of Chromium. The lines below add the repositories and install Firefox in the container:
#########################################
## REPOSITORIES AND DEPENDENCIES ##
#########################################
RUN echo 'deb http://archive.ubuntu.com/ubuntu trusty main universe restricted' > /etc/apt/sources.list && \
echo 'deb http://archive.ubuntu.com/ubuntu trusty-updates main universe restricted' >> /etc/apt/sources.list

# Install packages needed for app
RUN export DEBCONF_NONINTERACTIVE_SEEN=true DEBIAN_FRONTEND=noninteractive && \
apt-get update && \
apt-get install -y firefox
To change the browser to Firefox, I also had to modify the firstrun.sh and startapp.sh files that regulate the behavior of the container.
I also decided I wanted to be able to anonymize the browser a little more. One of the use-cases I have for the browser is to check out malicious urls that we encounter at work in a separate, contained environment. Unfortunately, the container runs on my homelab network, so any requests would show my public IP. To avoid that, I needed to be able to load extensions on the browser. Sure, I could just manually install some extensions via the Firefox add-ons store, but whenever the container restarts they would be gone. Also, it wouldn’t be portable for others to have instantly available. Overall, that’s just not the way Docker was meant to be used. I decided I needed to figure out how to side-load the extensions so that they are already baked into the browser when you start up the container.
After doing some Googling and playing around, I figured out that Firefox uses the directory /usr/share/mozilla/extensions/{ec8030f7-c20a-464f-9b0e-13a3a9e97384}/ as a place to side-load extensions. When you download a Firefox extension, it comes in the form of an xpi archive. To download the archive as a file, just copy the “Add Extension” button’s link in the Firefox add-on store. All you need to do to side-load the archive is place the xpi file in the side-loading directory with the correct naming scheme and Firefox will install the extension when it first opens. I mentioned that there needs to be a specific name for the archive. You name it {whatever the app ID is}.xpi and it will be recognized by Firefox. You can find the app ID of an extension by installing the extension on a live Firefox browser and then navigating to about:debugging. I added the Private Internet Access VPN, uBlock Origin, and Decentraleyes extensions to my container for privacy purposes as I mentioned before. Below are the lines I added to the Dockerfile in order to side-load the extensions automatically
# Set path to Firefox side-loading directory
ENV SIDE_LOAD_DIR=/usr/share/mozilla/extensions/{ec8030f7-c20a-464f-9b0e-13a3a9e97384}/

# Rename xpi archive to match application id of extension
ENV PIA_APP_ID={3e4d2037-d300-4e95-859d-3cba866f46d3}.xpi
ENV [email protected]
ENV [email protected]

... (redacted lines of Dockerfile) ...

# Download add-ons for Firefox and place them in the side-loading directory with the correct naming scheme
RUN curl -sSL https://addons.mozilla.org/firefox/downloads/file/3502793/private_internet_access-2.1.4.2-fx.xpi?src=dp-btn-primary -o $SIDE_LOAD_DIR$PIA_APP_ID && \
curl -sSL https://addons.mozilla.org/firefox/downloads/file/3027669/ublock_origin-1.20.0-an+fx.xpi?src=collection -o $SIDE_LOAD_DIR$UBLOCK_APP_ID && \
curl -sSL https://addons.mozilla.org/firefox/downloads/file/3048828/decentaleyes-2.0.12-an+fx.xpi?src=collection -o $SIDE_LOAD_DIR$DCTRL_APP_ID
It took me quite a while to learn where to get everything I needed, but now that I know the process to add an extension to the container it’s actually pretty straightforward. Find the download link, find the app ID, run curl, and place it in the side-loading directory with the right name.
You can find the source code for the container on my Github page (link in website footer), and an image of the container on my Dockerhub page. To pull the privacy container from Dockerhub and run it, you can just execute the following one-liner:
$ docker run -d --rm --ipc=host --privileged --name foxception lawndoc/foxception:Privacy
When you access the container with your browser, it should look something like this:
I recommend you understand container networking and web access control before making the container publicly accessible. Remember, anyone that can reach the container/site can use the browser to do whatever they want using YOUR public IP.
I hope you had as much fun reading about my project as I had making it. Feel free to comment or reach out if you want more instructions on how to set it up and play with it yourself, or if you have any suggestions for further improvements.


